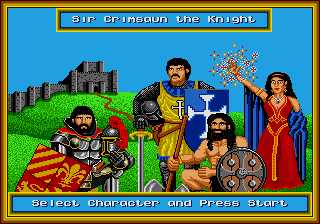
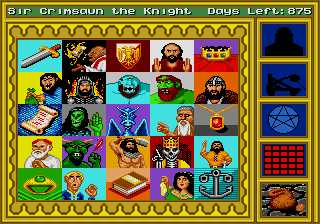
At the Character Selection screen, you can wait for a demo (don’t press any buttons), or choose to play as the Knight, Paladin, Sorceress, or Barbarian.
King’s Bounty
The Conqueror’s Quest
by Henry
Creators of the new world
New World Computing has been a distinguished innovator of interactive
recreational software for over five years. Based in Los Angeles, California,
New World produces a wide variety of games ranging from fantasy role-playing
adventures to tongue-in-cheek war games.
"The best life is a fun life", says New World founder Jon Van Caneghem. After
surrounding himself with a group of designers who rollerblade, engage in
paintball wars, and push race cars to the limit, he should know.
| SETTING UP |
4
|
SAVING THE GAME |
57
|
||||
| THEFT OF THE SCEPTRE |
5
|
NOBLES OF THE DARK LEGION | |||||
| WHAT YOU SEE |
8
|
TROOPS |
63
|
||||
| IN THE BEGINNING |
8
|
KING’S PRIVATE GUARD |
64
|
||||
| Character Selection |
8
|
PLAINS |
65
|
||||
| Difficulty Menu |
12
|
FOREST |
66
|
||||
| THE PLAYSCREEN |
13
|
DUNGEON |
68
|
||||
| OBJECTS |
18
|
HILL |
70
|
||||
| Treasure Chests |
18
|
DWELLINGS |
71
|
||||
| Signposts |
18
|
CASTLES |
71
|
||||
| Artifacts |
19
|
TOWNS |
74
|
||||
| GAMEPLAY |
21
|
SPELLS |
77
|
||||
| BASIC MOVEMENT |
21
|
ADVENTURE SPELLS |
77
|
||||
| COMBAT |
23
|
COMBAT SPELLS |
79
|
||||
| Field Combat |
23
|
HINTS AND STRATEGY |
82
|
||||
| Castle Siege |
24
|
APPENDIX A |
I
|
||||
| Movement |
25
|
Castle and town locations | |||||
| Combat Menu |
29
|
APPENDIX B |
II
|
||||
| RECRUITING TROOPS |
33
|
Troop chart | |||||
| At King Maximus’s Castle |
34
|
Morale chart | |||||
| In Troop Dwellings |
37
|
APPENDIX C |
IV
|
||||
| Wandering Troops |
38
|
Character advancement chart | |||||
| FIELD MENU |
39
|
APPENDIX D |
V
|
||||
| GETTING MONEY |
55
|
Villains to castles chart | |||||
| WINNING THE GAME |
55
|
APPENDIX E |
VII
|
||||
| Spells to towns chart | |||||||
|
|
||||||
Setting Up
While King Maximus ruled the land, life was good in the four continents. The Sceptre of Order rested safely in his hands, keeping at bay the forces of darkness that infested the world. Children were happy. Merchants prospered. Honest folks made honest livings. And nobody complained much.
But far across the waters, Arech Dragonbreath, leader of the Dark Legions,
looked enviously upon the wealth and splendor of the four continents. With
the aid of great magic, Arech stole into the chambers of King Maximus and
wrested the Sceptre from the grip of the sleeping King. He then released
his evil forces, ordering his minions and lieutenants to seize the land in
whatever manner they pleased (as long as it involved considerable amounts
of pain and terror).
Arech retired to his new lair on the four continents and waited for King
Maximus’s certain resistance. The King and his forces, however, offered
none. Fearing some kind of trickery, Arech peered into his prophetic crystal
to see what Maximus was up to. The crystal showed the King lying in bed,
his face pale and gaunt like death itself. Over the King stood a noble young
knight with the strength and resolve of great leader.
The King was speaking. "Come here" he gasped, "I am weak and breath is a
luxury. Please." He extended his hand and the great
leader drew close. "You must restore my kingdom. I, too, must be restored.
I am tied to this land and as it dies, so do I. My days here are numbered.
You must recover the Sceptre if I and my land are to live."
Arech watched this exchange and quickly buried the Sceptre somewhere on the
four continents. He draw a map of its location, then shredded it into 25
pieces. He gave one to each of his 16 villainous nobles, kept one for himself,
and the other eight he hid with powerful artifacts around the four
continents.
Your time grows short, leader. You have your quest and King Maximus’s
last hope. May you be guarded in your journey by the Spirits of Order. Good
luck!
Character Selection
Character Classes:
See the information boxes in each character’s section to see their starting
vitals. To learn more about each character’s advancement, see the
Character Advancement Chart in APPENDIX C.
SIR CRIMSAUN THE KNIGHT
 The
Knight starts his quest with the best troops of any of the four classes.
His leadership ability is paralleled only by the Barbarian, and his starting
gold and commission per week are among the highest.
The
Knight starts his quest with the best troops of any of the four classes.
His leadership ability is paralleled only by the Barbarian, and his starting
gold and commission per week are among the highest.
LORD PALMER THE PALADIN
 A Paladin’s leadership ability and initial troops are strong.
A Paladin’s Spell power is second only to a Sorceress’s, as is
his spell retention capability.
A Paladin’s leadership ability and initial troops are strong.
A Paladin’s Spell power is second only to a Sorceress’s, as is
his spell retention capability.
THE SORCERESS TYNNESTRA
 The Sorceress is the only leader who starts the game knowing how
to use magic. Her spell retention is the highest, but she has a difficult
path to success because of her weak leadership ability. Her starting troops
are among the most feeble.
The Sorceress is the only leader who starts the game knowing how
to use magic. Her spell retention is the highest, but she has a difficult
path to success because of her weak leadership ability. Her starting troops
are among the most feeble.
--- 10 ---
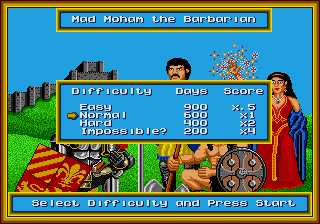
MAD MOHAM THE BARBARIAN
 A Barbarian’s leadership skills are equal to a Knight’s,
and his starting troops are strong. He advances in rank more rapidly than
any other class, but has weak magic skills. He must be taught the basics
of spell-casting and even then he has trouble reading a rune. The Barbarian
is the most successful of the four classes in battle.
A Barbarian’s leadership skills are equal to a Knight’s,
and his starting troops are strong. He advances in rank more rapidly than
any other class, but has weak magic skills. He must be taught the basics
of spell-casting and even then he has trouble reading a rune. The Barbarian
is the most successful of the four classes in battle.
|
|
|
|
|
| Name |
|
|
|
|
| Leadership |
|
|
|
|
| Maximum Spell Capacity |
|
|
|
|
| Spell Power |
|
|
|
|
| Commission per Week |
|
|
|
|
Difficulty Menu
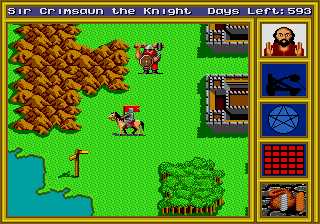
Current Contract
This panel shows which villain you currently hold a contract for. If you
have no contract, the square shows an empty shadow. Get a new contract or
exchange a current one in any town. You can only carry a contract for one
villain at a time. There are five contracts to choose from. Contracts are
always free.
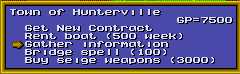
To get a contract:
Siege Weapon Availability
This indicates your siege weapon availability. When you have siege weapons,
the catapult moves. When you don't, it appears as a shadow. They are necessary
to attack a castle. If a siege attempt is unsuccessful, your siege weapon
is destroyed. Siege weapons are always 3000 gold.
To get siege weapons:
Spell-casting Ability
When you begin play, this panel is not active (changing colours) unless you
are playing as the sorceress Tynnestra. Visit
Archmage Aurange for magic capability in Continentia at coordinates 11,19. Lessons from Aurange cost 5000 gold.
Miniature Puzzle Map
This is a miniature representation of the Puzzle Map. When you find a piece
of the map, a square is removed. For more information about the Puzzle Map,
see Look At Puzzle Pieces under Field Menu in the MENUS
section.
Gold on Hand
This panel depicts how much money you are carrying. The three stacks of coins
from left to right are gold, silver, and copper. Use this to keep a general
idea of how much gold you have on hand. For an exact total, press A
or C when you’re roaming the continent and choose VIEW YOUR CHARACTER
from the Field Menu.
Treasure chests
![]() Chests are randomly placed over the continent. To open a chest,
walk on it. They contain:
Chests are randomly placed over the continent. To open a chest,
walk on it. They contain:
Gold which you can put in your personal cache or distribute to your
peasants to raise your leadership.
Rich Mineral Deposits for which the King rewards you with a raise
in your weekly salary.
Spell Capacity Increases from troop shamans you meet.
Maps of other continents. You must have maps to be able to travel
to other continents.
Signposts
![]() Read signposts you see along your journey to get information.
Read signposts you see along your journey to get information.
Artifacts
Artifacts have been hidden in various spots over the four continents.
Amulet of Augmentation
Amplify the spell power of any class with this amulet. A boon to spell casters,
especially barbarians, it is often fiercly guarded.
Anchor of Admiralty
When acquiring a boat, the rental price drops from 500 gold to 100 gold for
the bearer of this artifact.
Articles of Nobility
The articles increase the commission per week a character receives. Handed
out by King Maximus himself, the articles of nobility are a reward signifying
extraordinary service to the kingdom through heroic action.
Book of Necros
A tome of legend, this book increases your spell memory. The exact whereabouts
of the book are unknown, but a report of a minor wizard’s rapid rise
to power has fingers pointing...
Crown of Command
Originally crafted for a vanquished line of kings, the crown was lost long
ago by the royal family’s last son. When worn, it doubles the leadership
ability of any character class.
Ring of Heroism
A potent bauble, the Ring of Heroism increases leadership. It improves your
luck by helping you beat impossible odds.
Shield of Protection
The shield protects your entire army. Only the surest of blows can harm while
the shield is in your possession.
Sword of Prowess
The bearer of the Sword of Prowess can inflict more damage per blow during
battle.
Press B to fly
Press B over a grassy spot to land
To enter a dwelling, walk into it.
To sail to a different continent,
Find the map of the continent you want to sail to.
For information about movement during combat, see the Movement section under COMBAT.
There are two types of combat:
Field Combat
Field combat starts when you walk into a wandering troop, but wandering troops
do not always want to fight.
Occasionally they want to join your army, and sometimes they flee in terror at the sight of a large army. You don’t need siege weapons to engage in field combat.
If you are victorious in field combat, King Maximus congratulates you and gives you a reward. Rewards are based on your smarts and strength on the battlefield.
Castle Siege
This starts when you lay siege to a castle. You must have siege weapons to
engage in a castle siege. Get siege weapons at any town.
If you conduct a successful castle siege, you have the option to garrison the castle. If you garrison,
The troops you leave behind get paid once more before you leave, then live off the castle thereafter. For every castle you garrison, King Maximus increases your income.
Movement
Combat movement
is based on strategy – like a game of checkers or chess. Each troop
takes turns moving or attacking. Your army’s troops move first, then
the opposing army moves a troop at a time. This pattern continues until an
entire army is wiped out.
Your army faces right. The opposing army faces left.
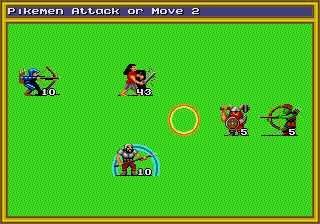
To use the Arrow Target:
Press A or C to activate it
Different troops move different. For example, most troops can only move one space at a time. But Sprites fly on their first move, so their Active Troop Target can skip to any grassy space – not just one adjacent to their current position. For a troop statistics chart that includes individual troop’s movement capability, see APPENDIX B.
To move your troop:
To attack:
Combat Menu
To select an option:
View your army
This shows the status of each troop in your army. For more information about
this option, see View Your Army under Field Menu in
GAMEPLAY.
View your character
This option details all aspects of your character. For more information about this option, see View Your Character under Field Menu in GAMEPLAY.
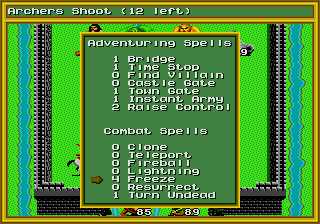
Use magic
This option can only be used if you have magic powers. It lists the different spells and how many you have of each. To learn more about individual spells, see the Spells section.
To use a spell:
An Adventure spell takes effect when you select it. With combat spells, you see a light blue ring on your troop that is about to use your spell.
If the combat spell is for an attack:
If the combat spell is to boost your troop:
Pass
This option lets a troop in your army pass on their turn at moving or attacking.
When a troop in your army is selected to take their turn and their movement
is completely blocked by an obstacle, choose this to skip their turn.
Wait
When you would prefer to have a troop take their turn at the end of your
army’s turns, choose this. For example if a troop in your army is designated
to move first, choosing WAIT lets the other troops in your army move, then
lets you move the waiting troop last. Pressing A or C while
the Active Troop Target is on the Active Troop, has the same effect as choosing
WAIT for that troop.
Game Controls
Press B during your turn in combat to view the Game Control Menu of
the following options:
The Combat Delay option controls the amount of time it takes to exchange turns during combat. Set the combat delay at zero to have the opposing army move in an instant. Set it at 9 to see opposing troops attack more slowly one by one.
To select an option:
The limit for the amount of troops you can recruit is based on your leadership points. You can recruit as many troops as you can control. For example, if you have 212 leadership points and you want to recruit Trolls at 50 hit points each, you would only be
able to recruit four. Five trolls would equal 250 hit points, more than your leadership points.
King Maximus’s Castle
You start the game in front of King Maximus’s castle. Castle-type troops
can only be recruited here. In the castle you can recruit castle soldiers
or have an audience with the King.
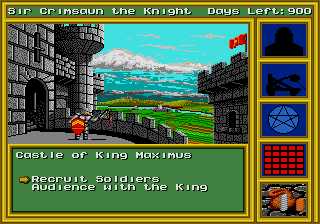
For more information about the AUDIENCE WITH THE KING option see At King Maximus’s Castle under Castles in the DWELLINGS section
The selection arrow appears at RECRUIT SOLDIERS. Press A or C to view the list of troops available.
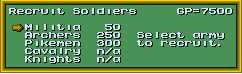
At first CAVALRY and KNIGHTS won’t be available because of your low rank. After your first promotion, you can recruit Cavalry. After your second promotion, you can recruit Knights.
Troop dwellings


Recruiting in troop dwellings is similar to recruiting at King Maximus’s castle:
If you can’t recruit troops, check to make sure you have enough gold, and have room for the new troop in your army (remember, you can only have 5 troops maximum in your army).
Wandering Troops
Usually field combat starts when you walk into a wandering troop, but sometimes
they want to join your army instead of fight. When you meet up with a friendly
troop, you have the option to accept or decline their service.
BE WARNED! Accepting a wandering troop of the same race as one you currently have in your army could put that troop out of control (make their hit points stronger than your leadership points). Their numbers are described with six phrases from "a few" to a "multitude". For amounts corresponding to these phrases, see the table in Towns under Dwellings.
Refer to APPENDIX B for information about a troop’s hit points, cost, skill level, movement capability, damage capability, and morale.
To accept or decline a troop:
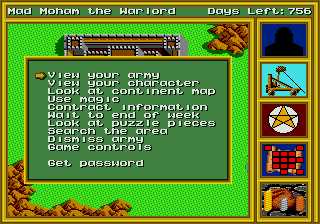
During gameplay, press A or C to see the Field Menu. Press A or C to exit the menus.
Choose from:
View your Army
This shows the status of each troop in your army. You can only have five different troops in your army. Troops may not be split up. When you recruit creatures of a race already in your forces, the new recruits are added to the current troop, even if it places them out of control.
View your Character
This option details all aspects of your character.
Look at Continent Map
A small pulsing point on this map represents your current location. As you travel across each of the four continents, you draw a map of the terrain. You may only view the map you have draw for the continent you are currently on. Look for magic orbs hidden around the continents that let you see the entire map.
Colours on the map represent different areas of the continent:
Use Magic
This option can only be used if you have magic powers. It lists the different spells and how many you have of each. To learn more about individual spells, see the Spells section.
--- 48 ---
To use a spell:
Adventure spells happen automatically. With combat spells, you see a light blue ring on your troop that is about to use your spell.
If the combat spell is for an attack:
If the combat spell is to boost your troop:
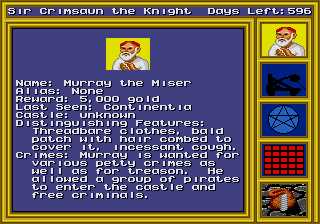
Contract Information
This option displays a picture of the villain you currently have a contract
for. The villain’s name, distinguishing features, and crimes are also
shown as well as his location, if you know it, and bounty offered for his
capture.
Wait to end of week
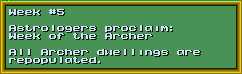
This option allows you to stop all actions and wait for the current week to pass. A week lasts five days. Every week is a
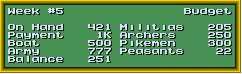
regeneration week for a different creature. If a creature’s week arrives, that creature’s dwellings are replenished. Press A, B, or C to view your budget. This calculates:
Next to this information is a breakdown of your current armies and how much each costs. Press A, B, or C to leave the menu.
Look at puzzle pieces
This replaces the adventure window with the Puzzle Map. For each villain
you catch under contract and each artifact you find, you get a piece of the
Puzzle Map. It shows the portions of
the map you have recovered by capturing villains and retrieving artifacts, and which remaining villain or artifact has which piece of the map.
Search the area
The sceptre is hidden under grass on one of the four continents. You must
search to find it, using clues from the Puzzle Map to deduce its location.
If you find the sceptre before time runs out, you save King’s
Maximus’s life and restore order to the chaotic land. If you search
for the sceptre without Arech Dragonbreath’s centre piece of the map,
the search lasts for ten days. If you have captured Arech, the search lasts
one day.
Dismiss Army
This command dismisses an entire troop from your service. The dismissed troop
disappears from the Four Continents forever. You may recruit from the troop
race again.
Game Controls
Select this option to:
The Combat Delay option controls the amount of time it takes to exchange turns during combat. Set the combat delay at zero to have the opposing army move in an instant. Set it at 9 to watch the opposing troops attack more slowly.
To select an option:
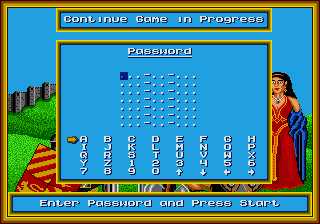
Get Password
This option gives you a password for the current game. Write it down.
You have the option to use it the next time you start the game at the Character
Selection screen.
Note: When you use your password, it makes no difference if you enter
the number zero or the Letter "O"; the game sees them as the same character.
For more information about saving your game, see the Saving the Game
section under GAMEPLAY.
There are several ways to get rich quick.
You must find the Sceptre of Order to restore King Maximus’s land before he dies.
To find the Sceptre of Order:
To save a game:
Note: Passwords do not save:
Some treasure chests reappear in which the Orbs can be refound.
To use the password at the Character Selection screen:
![]() Murray the Miser
Murray the Miser
Murray is a villainous traitor who helped Arech and his army of rogues for
a small reward and a castle to call his own.
![]() Hack the Rogue
Hack the Rogue
Hack the Rogue is wanted for conspiracy against the crown and grave-robbing.
![]() Princess Aimola
Princess Aimola
Princess Aimola is wanted for joining a conspiracy against King Maximus.
![]() Baron Johnno Makahl
Baron Johnno Makahl
Baron Johnno Makahl is wanted for leading Arech’s army into the King’s
castle.
![]() Dread Pirate Rob
Dread Pirate Rob
Dread Pirate Rob is wanted for piracy in the Pond of Peril and releasing
traitors from Maximus’s royal Dungeons.
![]() Caneghor the Mystic
Caneghor the Mystic
Caneghor the Mystic is wanted for assisting in the downfall of the four
continents by spell-casting for the dark legions.
![]() Sir Moradon the Cruel
Sir Moradon the Cruel
Sir Moradon is a traitor known for chopping small rodents with an axe to
keep his temper under control.
![]() Prince Barrowpine
Prince Barrowpine
Prince Barrowpine is wanted for trafficking stolen artifacts.
![]() Bargash Eyesore
Bargash Eyesore
A lumbering cyclops, Bargash is as stupid as he is strong. He’s regarded
as a permanent enemy of the crown.
![]() Rinaldus Drybone
Rinaldus Drybone
Rinaldus Drybone is king of the undead.
![]() Ragface
Ragface
Ragface is wanted for conspiring to steal the sceptre with Auric Whiteskin,
Arech Dragonbreath, and Rinaldus Drybone.
![]() Mahk Bellowspeak
Mahk Bellowspeak
Since Arech took rule of the four continents away, Mahk has been pillaging
and attacking innocent townsfolk.
![]() Auric Whiteskin
Auric Whiteskin
Wanted for conspiring with Arech to steal the Sceptre of Order, Auric helped
plan the attack on the King’s castle.
![]() Czar Nickolai
Czar Nickolai
Czar Nickolai is wanted for summoning the demon king Urthrax Killspite to
help keep the chaotic four continents under Arech’s rule.
![]() Magus Deathspell
Magus Deathspell
Magus Deathspell is wanted for deciphering the prophecy that foretold of
the downfall of order on the four continents.
![]() Urthrax Killspite
Urthrax Killspite
Urthrax Killspite is the demon King. He was summoned to help attack and rule
the four continents by Czar Nickolai.
![]() Arech Dragonbreath
Arech Dragonbreath
Arech Dragonbreath is the leader of the Dark Legion and destroyer of order.
For information about each troop’s skill level, hit points, movement capability, damage ability, morale, and cost, see APPENDIX B.
Members of the private guard are the most highly trained and skillful. They fight well when allied with Plains creatures.
![]() Militia
Militia
These dependable fighters are a strong match for opposing troops.
![]() Archers
Archers
Archers wait in a lonesome corner of the battlefield and shoot down unfortunate
targets. They can shoot 12 times in any battle.
![]() Pikemen
Pikemen
Pikemen inflict heavy damage with their pikes and are well worth their expensive
wage.
![]() Cavalry
Cavalry
Cavalry is used for swift and hard-hitting attacks. They are available for
recruit at the King’s castle after your first promotion.
![]() Knights
Knights
These fledgling lords are professional soldiers. Though slow and headstrong,
they are powerful fighters. They are available for recruit after your second
promotion.
Only the strongest creatures survive on the plains. Recruit Plains troop for their brute strength.
![]() Peasants
Peasants
Easily influenced and guided, these hapless denizens of the plains are strongest
in vast numbers.
![]() Wolves
Wolves
Since they only bite for a minor amount of damage, wolves are most effective
in large packs.
![]() Nomads
Nomads
These crafty desert traders are savage and fierce. Good fighters, they are
somewhat hard to control.
![]() Barbarians
Barbarians
Barbarians can be devastating fighters, however, their independent nature
makes them difficult to keep in rank and file.
![]() Archmages
Archmages
Archmages can fly and attack at the same time. They can cast a fireball spell
twice in any combat round.
Accustomed to close fighting in the woods, forest creatures are tricky and sly.
![]() Sprites
Sprites
These flying woodland creatures fly fast and follow orders well, but they
die easily and have difficult landing a strong blow due to their small size.
![]() Gnomes
Gnomes
Dwelling in caves below the tree trunks, these underground dwellers make
a stolid fighting force. Like Sprites, Gnomes have problems fighting larger
opponents, who can crush large numbers of them in a single round.
![]() Elves
Elves
Armed with bow and arrow, Elves are an effective fighting force. They can
decimate opponents of equal force with a distance strike. They can shoot
arrows 24 times per battle.
![]() Trolls
Trolls
Trolls take a long time to die and are capable of inflicting great damage
on their enemies. If not killed in combat, trolls regenerate to full hit
points.
![]() Druids
Druids
Druids have the best qualities of all the forest creatures. Cunning, yet
easy to control, they can throw a lightning bolt three times in any battle.
Dungeon creatures are the undead class. Watch them carefully – they have nothing to lose by turning on you.
![]() Skeletons
Skeletons
Age-old corpses rambling across the four continents in search of a final
resting place, skeletons are the least powerful of the dungeon class.
![]() Zombies
Zombies
Stronger and more durable than skeletons, zombies are slow and pack a substantial
punch. Lead them in packs of seven to 12 for an effective attack.
![]() Ghosts
Ghosts
Skillful combatants and highly mobile, ghosts are excellent fighters. Defeated
enemies join the ghost troop. Beware, ghosts can easily get out of control.
If the Week of the Peasant falls while Ghosts are serving you, they transform
into peasants.
![]() Vampires
Vampires
The aristocracy of the night, vampires are formidable troops. A vampire can
heal himself by striking an enemy.
![]() Demons
Demons
The lords of the dungeons, demons can cut an enemy troop in half with one
blow. They are skillful warriors that can defeat anything but a dragon.
Creatures bred in the hills are tough, and make strong fighters. You’ll need luck on your side to defeat them. Count yourself honoured if they ask to join your legions.
![]() Orcs
Orcs
Numerous and capable of strong attacks, it’s hard to go wrong with an
orc legion. Orcs have six shots in any battle.
![]() Dwarves
Dwarves
Kept in practice by defending their homes from Orc hordes, Dwarves are able
warriors. Thought small, they deliver an outstanding blow.
![]() Ogres
Ogres
Ogres live for destruction and destroy enemies easily. Ogres are slow, so
position them for maximum effect with minimum movement.
![]() Giants
Giants
Their fearsome boulder attacks and crushing hand-to-hand blows allow giants
to rampage across their lessers. Giants can throw boulders six times in any
battle.
![]() Dragons
Dragons
A dragon can endure and inflict more damage than any other creature. They
can fly during battle and are completely immune to magic. Only the mighty
can control a flock of dragons in an army.
For information about recruiting from dwellings, see Recruiting Troops under GAMEPLAY.
At King Maximus’s castle:
The supply of these troops is virtually unlimited, bet they are costly. As you gain rank, more powerful soldiers become available for hire. For trait descriptions of these different troops, see the castles section under TROOPS. For instructions about how to recruit troops see King Maximus’s Castle under RECRUITING TROOPS.
At other castles:
If inhabited, a castle contains either one of the 17 villains or a rag-tag
group of marauders who are based here. If you have siege weapons, battle
begins. If uninhabited, you may assign a troop to garrison the castle, thereby
increasing your score and weekly income. When you garrison a castle, you
pay for the troops for one week. After that they live off the castle. If
you return to a castle and remove the troops, you must begin paying them
again.
If you win a battle, you may garrison the castle with some of your surviving legions. This increases your commission per week and your current score. If you hold a contract for the defeated lord of the castle, you receive a piece of the puzzle map. If you do not hold a contract for the defeated lord, the lord is set free and eventually relocates to a new castle. If you do not garrison a castle, it can repopulate.

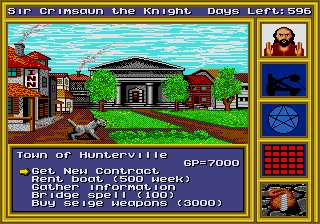
In a town you can:
Track down the villain
Conquer their troops
There are five villains‘ contracts to choose from.
For information about troop dwellings (Hills, Dungeons, Covered Wagons, and Tree Houses), recruiting troops from them, and pictures of their dwellings, see Troop dwellings under RECRUITING TROOPS.
Spells can only be used once. For information about how to use spells, see Use Magic under FIELD MENU.
These spells can be cast whenever you are able to move. They cannot be cast:
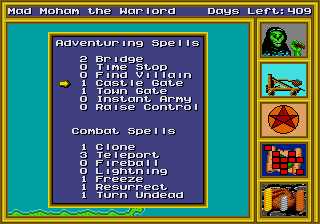
Bridge
This spell allows you to build a bridge going north, east, south, or west.
Use a bridge spell to cross a stream or river. Multiple bridges may be attached
to one. Anther. Bridges created are permanent.
Time Stop
use Time Stop when you have a high Spell Power to give you more time to find
the sceptre. You still get paid at the end of a week, but your amount of
days to find the sceptre stays the same.
Find Villain
This reveals the location of the villain whose contract you are currently
holding. Only the villain's location is revealed, not his troop type and
size.
Castle Gate
This spell allows you and your army to teleport to any castle previously
visited. Go to a castle you have garrisoned and recruit the troops back into
your army to replenish your fighting power with this spell.
Town Gate
This allows you and your armies to move instantly to a previously visited
town.
Instant Army
Instant Army adds another troop to your ranks. The size of the troop depends
on your spell power and the type of creature recruited is based on your class
and level ranking.
Raise Control
This spell raises your leadership ability. Use it before combat with a powerful
villain for strength, or just before you recruit troops for higher recruitment
numbers. This spell lasts one week.
Use these in combat.
Clone
This allows you to add creatures to troop in your army through cloning. The
actual number of creatures cloned is proportional to your spell power.
Teleport
This allows you to teleport a troop, friend or foe, to any unoccupied grass
on the combat screen. You can manipulate troops to destroy enemy archers,
displace strong enemy troops, and insert your own forces in key locations.
Fireball
This arms you with a fireball which you can hurl at any single enemy troop.
The damage you do depends on your spell power - the higher your spell power,
the stronger the damage.
Lightning Bolt
Weakest of the three offensive-weapon spells, the lightning bolt allows you
to throw a bolt at any single enemy troop. The higher your spell power, the
more destructive the spell.
Freeze
This spell restricts an enemy troop's movement, holding it in place for one
combat round. The enemy troop can, however, attack adjacent troops and can
retaliate if attacked.
Resurrect
This spell restores creatures destroyed in combat, one per unit of your spell
power. Creatures may only be restored if some of the original troop remains.
Turn Undead
Strongest of the three offensive-weapon spells, Turn Undead targets an enemy
troop of undead creatures and unleashes a torrent of destruction on skeletons,
zombies, ghosts, and vampires.
Boats
If you dock your boat and walk far across the continent, save some time by
finding a town close to you, canceling the boat rental, then re-renting a
boat. Your new boat conveniently appears in the water close by. Be warned:
it'll cost you another 500 gold, so you might want to rent at the end of
a week (when you would have been charged for weekly boat rental anyway).
Recruiting troops
When you are recruiting from a troop dwelling or the King's castle, don't
recruit all the members of a troop. If you empty a dwelling and take your
army into a losing battle, you won't be able to recruit from the dwelling
or castle again until that creature's week passes.
Combat with Ghosts
Only attack ghosts with troops of a stronger hit strength. Ghosts absorb
fallen foes into their troop and get incredibly strong. Keep your peasants,
Militia, and other weak troops out of their reach.
| Continentia | |||
| Castles | Towns | ||
| Azram | 30,27 | Bayside | 41,58 |
| Cancomar | 36,49 | Fjord | 46,35 |
| Faxis | 22,49 | Hunterville | 12,3 |
| Irok | 11,30 | Isla Vista | 57,5 |
| Kookamunga | 57,58 | King's Haven | 17,21 |
| Nilslag | 22,24 | Lakeview | 17,44 |
| Ophiraund | 6,57 | Nyre | 50,13 |
| Portalis | 58,23 | Path's End | 38,50 |
| Rythacon | 54,6 | Quiln Point | 14,27 |
| Vutar | 40,5 | Riverton | 29,12 |
| Wankelforte | 40,41 | Xoctan | 51,28 |
| Forestria | |||
| Castles | Towns | ||
| Basefit | 47,6 | Anomaly | 34,23 |
| Duvock | 30,18 | Dark corner | 58,60 |
| Jahn | 41,34 | Elan's Landing | 3,37 |
| Mooseweigh | 25,39 | Midland | 58,33 |
| Quinderwitch | 42,56 | Underfoot | 58,4 |
| Yeneverre | 19,19 | Wood's End | 3,8 |
| Archipelia | |||
| Castles | Towns | ||
| Endryx | 11,46 | Centrapf | 9,39 |
| Goobare | 41,36 | Japper | 13,7 |
| Hyppus | 43,27 | Overthere | 57,57 |
| Lorshe | 52,57 | Simpleton | 13,60 |
| Tylitch | 9,18 | Topshore | 5,50 |
| Xelox | 45,6 | Yakonia | 49,8 |
| Saharia | |||
| Castles | Towns | ||
| Spockana | 17,39 | Grimwold | 9,60 |
| Uzare | 41,12 | Vengeance | 7,3 |
| Zyzzarzaz | 46,43 | Zazoizu | 58,48 |
| MONSTERS | Skill Level | Hit Points | Movement | Damage Attack, Shoot | Recruitment Cost | Morale Group |
| Castle | ||||||
| Militia |
|
|
|
|
|
|
| Archers |
|
|
|
|
|
|
| Pikemen |
|
|
|
|
|
|
| Cavalry |
|
|
|
|
|
|
| Knights |
|
|
|
|
|
|
| Plains | ||||||
| Peasants |
|
|
|
|
|
|
| Wolves |
|
|
|
|
|
|
| Nomads |
|
|
|
|
|
|
| Barbarians |
|
|
|
|
|
|
| Archmages |
|
|
|
|
|
|
| Forest | ||||||
| Sprites |
|
|
|
|
|
|
| Gnomes |
|
|
|
|
|
|
| Elves |
|
|
|
|
|
|
| Trolls |
|
|
|
|
|
|
| Druids |
|
|
|
|
|
|
| Hills | ||||||
| Orcs |
|
|
|
|
|
|
| Dwarves |
|
|
|
|
|
|
| Ogres |
|
|
|
|
|
|
| Giants |
|
|
|
|
|
|
| Dragons |
|
|
|
|
|
|
| Dungeon | ||||||
| Skeletons |
|
|
|
|
|
|
| Zombies |
|
|
|
|
|
|
| Ghosts |
|
|
|
|
|
|
| Vampires |
|
|
|
|
|
|
| Demons |
|
|
|
|
|
|
| A | B | C | D | E | ||
| Other | A | N | N | N | N | N |
| Units | B | N | N | N | N | N |
| In Army: | C | N | N | H | N | N |
| D | L | N | L | H | N | |
| E | L | L | L | N | N |
L = Low morale (if any low in army).
N = Normal morale.
H = High morale (only if all units are H).
|
|
|
# spells |
|
/week |
| Knight |
|
|
|
|
|
| General |
|
|
|
|
|
| Marshal |
|
|
|
|
|
| Lord |
|
|
|
|
|
| Paladin |
|
|
|
|
|
| Crusader |
|
|
|
|
|
| Avenger |
|
|
|
|
|
| Champion |
|
|
|
|
|
| Barbarian |
|
|
|
|
|
| Chieftain |
|
|
|
|
|
| Warlord |
|
|
|
|
|
| Overlord |
|
|
|
|
|
| Sorceress |
|
|
|
|
|
| Magician |
|
|
|
|
|
| Mage |
|
|
|
|
|
| Archmage |
|
|
|
|
|
Must learn magic to cast spells
Make a copy of this chart for each new game:
| Castles | X | Y | Murray the Miser | Hack the Rogue | Princess Aimola | Baron Johnno Makahl | Dread Pirate Rob | Caneghor the Mystic | Sir Moradon the Cruel | Prince Barrowpine | Bargash Eyesore | Rinaldus Drybone | Ragface | Mahk Bellowspeak | Auric Whiteskin | Czar Nickolai the Mad | Magus Deathspell | Urthrax Killspite | Arech Dragonbreath |
| Continentia | |||||||||||||||||||
| Azram | 30 | 27 | |||||||||||||||||
| Cancomar | 36 | 49 | |||||||||||||||||
| Faxis | 22 | 49 | |||||||||||||||||
| Irok | 11 | 30 | |||||||||||||||||
| Kookamunga | 57 | 58 | |||||||||||||||||
| Nilslag | 22 | 24 | |||||||||||||||||
| Ophiraund | 6 | 57 | |||||||||||||||||
| Portalis | 58 | 23 | |||||||||||||||||
| Rythacon | 54 | 6 | |||||||||||||||||
| Vutar | 40 | 5 | |||||||||||||||||
| Wankelforte | 40 | 41 | |||||||||||||||||
| Forestria | |||||||||||||||||||
| Basefit | 47 | 6 | |||||||||||||||||
| Duvock | 30 | 18 | |||||||||||||||||
| Jhan | 41 | 34 | |||||||||||||||||
| Mooseweigh | 25 | 39 | |||||||||||||||||
| Quinderwitch | 42 | 56 | |||||||||||||||||
| Yeneverre | 19 | 19 | |||||||||||||||||
| Archipelia | |||||||||||||||||||
| Endryx | 11 | 46 | |||||||||||||||||
| Goobare | 41 | 36 | |||||||||||||||||
| Hyppus | 43 | 27 | |||||||||||||||||
| Lorshe | 52 | 57 | |||||||||||||||||
| Tylitch | 9 | 18 | * | ||||||||||||||||
| Xelox | 45 | 6 | |||||||||||||||||
| Saharia | * | ||||||||||||||||||
| Spockana | 17 | 39 | |||||||||||||||||
| Uzare | 41 | 12 | * | ||||||||||||||||
| Zyzzarzaz | 46 | 43 |
Make a copy of this chart for each new game:
| Adventure Spells | Combat Spells | |||||||||||||||||
| Towns | X | Y | Bridge | Castle Gate | Find Villain | Instant Army | Raise Control | Time Stop | Town Gate | Cone | Fireball | Freeze | Lightning | Resurrect | Teleport | Turn Undead | ||
| Continentia | ||||||||||||||||||
| Bayside | 41 | 58 | ||||||||||||||||
| Fjord | 46 | 35 | ||||||||||||||||
| Hunterville | 12 | 3 | * | |||||||||||||||
| Isla Vista | 57 | 5 | ||||||||||||||||
| King's Haven | 17 | 21 | ||||||||||||||||
| Lakeview | 17 | 44 | ||||||||||||||||
| Nyre | 50 | 13 | ||||||||||||||||
| Path's End | 38 | 50 | ||||||||||||||||
| Quiln Point | 14 | 27 | ||||||||||||||||
| Riverton | 29 | 12 | ||||||||||||||||
| Xoctan | 51 | 28 | ||||||||||||||||
| Forestria | ||||||||||||||||||
| Anomaly | 34 | 23 | ||||||||||||||||
| Dark corner | 58 | 60 | ||||||||||||||||
| Elan's Landing | 3 | 37 | ||||||||||||||||
| Midland | 58 | 33 | ||||||||||||||||
| Underfoot | 58 | 4 | ||||||||||||||||
| Wood's End | 3 | 8 | ||||||||||||||||
| Archipelia | ||||||||||||||||||
| Centrapf | 9 | 39 | ||||||||||||||||
| Japper | 13 | 7 | ||||||||||||||||
| Overthere | 57 | 57 | ||||||||||||||||
| Simpleton | 13 | 60 | ||||||||||||||||
| Topshore | 5 | 50 | ||||||||||||||||
| Yakonia | 49 | 8 | ||||||||||||||||
| Saharia | ||||||||||||||||||
| Grimwold | 9 | 60 | ||||||||||||||||
| Vengeance | 7 | 3 | ||||||||||||||||
| Zaczoizu | 58 | 48 | ||||||||||||||||